|
|
 |
| Uploading using WS_FTP LE |
 |
Before you begin you will need to obtain and install WS_FTP LE. You can download it from WS_FTP LE is available for download from http://www.ipswitch.com/downloads or you will be able to find it on the cover discs provided with must good Internet magazines.
After installing the software you must be connected to the Internet to begin using WS_FTP. Before transferring any files, you'll need to know your User Name and Password. These details are provided in the account letter issued when you hosting account was fisrt created. If you have subsequently changed your password then you should use the most recent one. If you do not know you Ftp User Name or Password then please contact support.
Guide to using WS_FTP
When you start WS_FTP, it opens by default to the Session Properties dialog box. (see diagram).
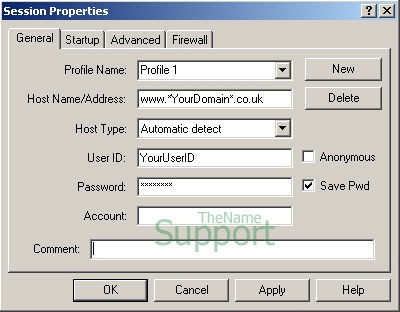
- Profile Name
Choose any name for the profile name text box. The profile will be saved with your login information for the next connection attempt. It is a label for your benefit to identify this particular entry in the site list.
- Host Name/Address
This is the address of your webpage for example, "www.thenamesupport.co.uk". You should get this information from your account details.
- Host Type
This option allows the user to specify the type of FTP server to connect to. It is best to leave this option as "Automatic detect".
- User ID
This is the identification needed to log onto the server for your site. You should get this information from your account details.
- Anonymous Login
Anonymous FTP is used on many public FTP servers on the Internet. However, it is not needed for our servers. To disable anonymous login, click the Anonymous check box so that it is unchecked (blank).
- Password
The Password is needed to log onto the server. You should get this information from your account details unless it is changed by the user.
- Saving Your Password
With this option you won't have to type your password, upon every login. To do this, click "Save Pwd" to enable this feature.
WARNING: If others have access to your files, you should be aware that checking the Save Password check box will save your password to your hard drive in an encrypted form. It is, however, not difficult to un-encrypt for someone who is determined to do so. If you don't save your password here, you must type it in each time you use FTP to log onto your web site.
- Account
Leave the Account box blank unless we specify you to use an account name.
- Comment
This option provides a space for you to add a comment about the particular FTP site. This is only for user benefit.
You are now ready to connect to our server. Check you have an active internet connection at this point. WS_FTP LE will attempt to connect to your webspace.
- If you have just entered the FTP connection details, click "OK" in the "Session Properties" window to connect to the site. If you have a pre-existing profile ready to use, click "Connect" in the main program window, choose your profile in the "Session Properties" window, the click "OK" to connect to the site.
- Once you have connected to the site you will see the local system on the left side of the disaplay and the remote site on the right. The local system is your computers hard disc and the remote site is the web server. Before any file uploads can take place you must find the file(s) on the local system and you must choose the target path on the remote site. By default our server will place you in the "/users/user/" folder, however this directory is not the root web directory. You must change the path on the remote site to "/web/" in order to upload to the correct root web directory. You should change the local system path to the folder where you saved the website files on your computer.
- Once you have located the file(s) in the left (local system) window and have changed to the appropriate folder in the right (remote site) window, select the file(s) and/or folder(s) that you want to upload then click on the -> button situated in between the two sides. You should then see a copy of the file uploaded to the remote site window.
- To double check to see if the file was placed in correct location. Open your web browser. Enter the URL of the file you just uploaded in the form of www.yourdomain.co.uk/file1.html where the file "file1.html" is the file uploaded to the "/web/" path.
- You can make new directories on the remote site by clicking the "MkDir" button on the remote site side of the program. If you want to make a new directory in the "/web/" directory you will need to change to the "/web/" path on the remote site before clicking the "MkDir" button.
Back to Uploading
Back to Hosting
|
For more information see:
Uploading your Web Pages - detailed instructions on getting your site on line.
Email - how to use the e-mail part of your hosting account.
Control Panel - how to access our online control panel and set up new mail users.
Web Stats - about your sites web stats
Web Mail - how to access you POP mail using The Name Webmail
Advanced Hosting Information - How to set up cgi scripts, hidden directories and custom error pages. |
|
|
|
| Latest: |
 |
Free Web Mail
|
Host with thename.co.uk and get access to your e-mail from a browser completely Free!
|
Free Web Stats
|
thename.co.uk offers all hosting & forwarding customers Free visitor statistics - Vital for knowing how your site is performing
|
Hosting offers:
|
| Hosting with thename.co.uk costs from just £3.75 per month. Each account comes with its own dedicated bandwidth quota, 25MB webspace, 15 Mail POP accounts and Frontpage extensions. |
 |
|
|